DO YOU KNOW YOUR BRA SIZE?
Let's find your proper bra size! When taking measurements make sure you're recording in inches and you are not holding your breath while you do this, as it can distort the measurement. You want the measuring tape snug but not too tight or too loose on your body.
Step 1 - Band Measurement

The first step involves measuring around your body and underneath your bust. The measuring tape should fit snugly at the base of your breasts, where your breast tissue starts to leave your body. The tape measure should be parallel to the floor and it should be held firmly.
Key Note: If you measured under your bust at 38 inches, you will be a 38 band size. If you measured in between or at an odd number like 35 or 37 inches round to the nearest even number. Bra sizes are even numbers and you want to round!
Step 2 - Cup Measurement

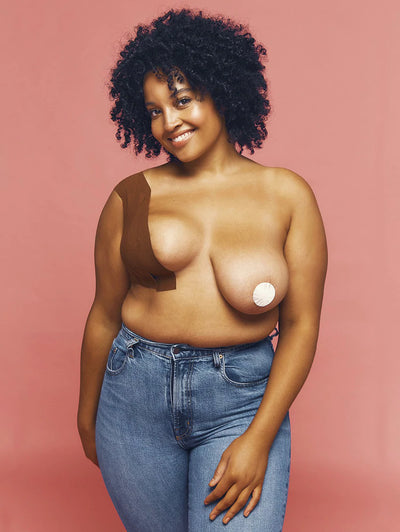
Part A: The second step involves measuring around your back and the fullest part of your bust.
Part B: Now that you have your Part A number and your band measurement (Step 1) take the difference and that will give your cup size! For every one inch difference between these numbers, your cup size goes up by one letter starting at A.
Key Note: If you measured 38 inches under your bust and 44 inches around your breasts (a difference of 6 inches), your bra size will be a 38F (the 6th letter in the alphabet).
Step 3 - Adjusting your Breast Tissue

Did you know that after your bra is on, adjusting your breast tissue can make or break the comfort level and overall fit?
Reach into the cup diagonally with the hand on your opposite side and "scoop" your breasts up and in. Make sure to reach towards the bottom outer portion of your breast, near your underarm, and pull all of your breast tissue above the wire and towards the center of your chest. After you have done this, take one finger and gently sweep any excess breast tissue away from the top of the cup and center wires.
These important adjustment needs to be made every time you put on a bra as they ensure that you are wearing the right bra size, the underwire is not sitting on your breast tissue, and your bra is giving you maximum support.
Step 4 - Checking Your Fit

The band should be level and parallel to the floor If the band is too loose, it will ride up in the back and cause your breasts to slide down.
The transition from cup to breast should be smooth If the cup is cutting into your breast, it is too small. If there is puckering or wrinkling in the fabric, the cup is too large.
The center wires should be resting flat against your chest (not your breasts) and they should create breast separation.
You should be able to fit two fingers comfortably underneath the straps without too much space.
Bands should be snug but comfortable If you were wearing a band size that was too large before, your new bra will feel very snug to start off with; this is normal. If wearing bras tighter in the band is new to you, there’s nothing wrong with easing your way into it. Try your new bra with an extender until it stretches.